This is the forum archive of Homey. For more information about Homey, visit the Official Homey website.
The Homey Community has been moved to https://community.athom.com.
This forum is now read-only for archive purposes.
The Homey Community has been moved to https://community.athom.com.
This forum is now read-only for archive purposes.
Connect Fibaro Dimmer 2 module with only L (fase) at switch
 MrDutchfighter
Member
Hi all,
I've got a question regarding the Fibaro Dimmer 2 and can't seem to find a definitive answer on the internet.
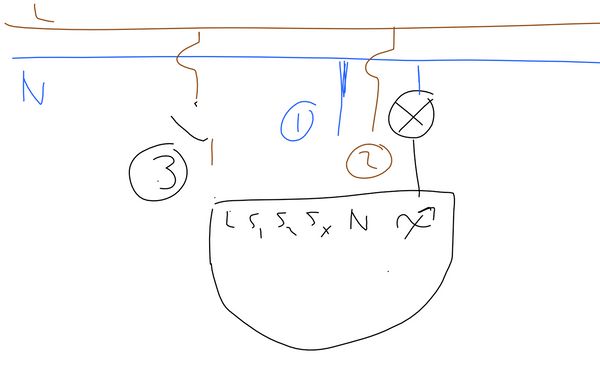
The situation is as follows: I've got a Fibaro Dimmer 2 module that I want to connect to a lamp. But I've only got the fasedraad (L) and schakeldraad (T) available at the switch. The positive thing is that I do have three wires available at the lamp: fase, nul and the schakeldraad (L, N and T). Now the question.. how do I connect them.. I've made four drawings, the first one is a sketch of the situation.
And I know the 'easy' solution would be to get either two schakeldraden to the switch, or to get the nul and fase available at the switch. But this isn't an option for this old house with stuffed pipes
1: Nul (N), available at lamp only
2: Fase (L), connected as input of switch, also seperately available at lamp
3: Schakeldraad (T), connected as output of switch and available at lamp

Below, option 1.
Connect the L and N with the L and N on the Fibaro Dimmer.
Connect the Schakel with S1.
Leave S2 and Sx empty.

Below, option 2.
Connect the L and N with the L and N on the Fibaro Dimmer.
Connect the Schakel with S1.
Leave S2 empty.
Connect Sx with N wire.

Below, option 3.
Connect the L and N with the L and N on the Fibaro Dimmer.
Connect the Schakel with S1.
Leave S2 empty.
Connect Sx with outgoing wire to the lamp (so in the end this connects to the N wire as well, no difference with option 2?).
Thanks in advance!
I've got a question regarding the Fibaro Dimmer 2 and can't seem to find a definitive answer on the internet.
The situation is as follows: I've got a Fibaro Dimmer 2 module that I want to connect to a lamp. But I've only got the fasedraad (L) and schakeldraad (T) available at the switch. The positive thing is that I do have three wires available at the lamp: fase, nul and the schakeldraad (L, N and T). Now the question.. how do I connect them.. I've made four drawings, the first one is a sketch of the situation.
And I know the 'easy' solution would be to get either two schakeldraden to the switch, or to get the nul and fase available at the switch. But this isn't an option for this old house with stuffed pipes
1: Nul (N), available at lamp only
2: Fase (L), connected as input of switch, also seperately available at lamp
3: Schakeldraad (T), connected as output of switch and available at lamp

Below, option 1.
Connect the L and N with the L and N on the Fibaro Dimmer.
Connect the Schakel with S1.
Leave S2 and Sx empty.

Below, option 2.
Connect the L and N with the L and N on the Fibaro Dimmer.
Connect the Schakel with S1.
Leave S2 empty.
Connect Sx with N wire.

Below, option 3.
Connect the L and N with the L and N on the Fibaro Dimmer.
Connect the Schakel with S1.
Leave S2 empty.
Connect Sx with outgoing wire to the lamp (so in the end this connects to the N wire as well, no difference with option 2?).

Thanks in advance!
Comments
so these drawings doesn't seem relevant enough for your situation?
it's in the manual
@Lonkai, that's exactly what I'm trying to achieve. But I don't know how. As I'm not able to get an extra wire from the 'centraaldoos' to the light switch.
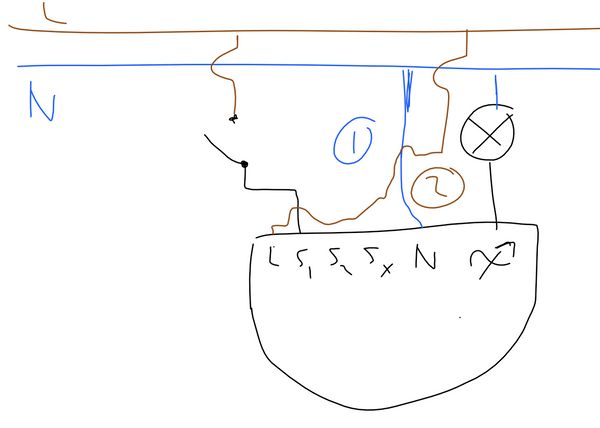
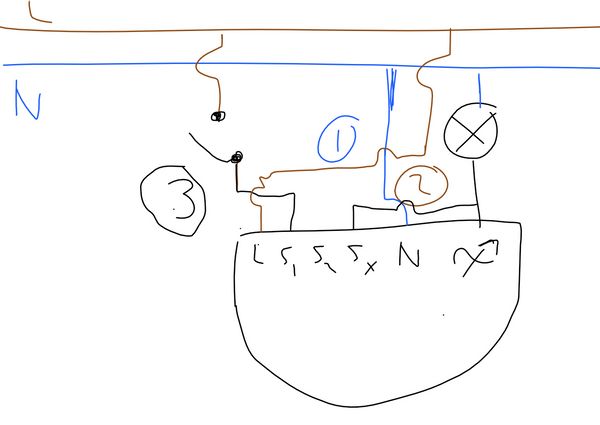
I added two extra drawings, in the hope to clarify things a bit more. The first is the current situation without the dimmer connected. The second is the new situation (with the dimmer 2 at the centraaldoos). but without the 'schakeldraad' connected. If this can't be done, then that's an answer as well.. but this should be possible right?
Sx (to the switch) gets 230 volts when you have a fase connected to the input (required)
Which is why s1 and s2 (both optional) work this way
the "schakeldraad" is the wire between the dimmer and the light
And the null of the dimmer is connected to Sx since you don't have the null wire in your switch box.
It had everything you require without having to pull any new wires and only works with the dimmer 2
You then connect L and N directly to the L and N bundles to power the dimmer. Finally a wire from the dimmer's output to the lamp.
I'm glad the wiring in my house was more convenient
Heeft iemand een idee waar het aan kan liggen?
Sorry! I did'nt realise I posted in the english part :-D
This afternoom i tried to connect the fibaro dimmer 2 behind the switch. I follewed the instruction in the movie above. After putting the electrisiti back on the light keeps shining and flashing. The switch doesn't work anymore....when i try to switch the light on or off the light keeps flashing. I can pair the dimmer into homey.
Is there somebody who has any idea what the problem can be?
Another reason for the flickering can be that the lamp itself isn't dimmable.